Wednesday, January 27, 2016

EMIGALL: Upload legacy file

1. Go to Tcode EMIGALL and enter our company TEST, then click continue.


2. Select the migration object by double clicking on it. Click on 'Data Import' button (Shift+F6).


3. Select radio button 'Batch work process' and provide a file name. The uploaded data will be stored in the application server (Tcode-AL11) in this file name. Click on create button.


4. Go to menu, Edit->Data->Upload and select the converted file.


5. Press back button, then click on Import data (Shift+F5). You will get a pop-up to schedule the data upload. Select radio button 'Start immed' and click on start.


6. Go to Tcode SM37, and check the the status. If the status is 'Finished', the legacy data has been migrated. If any error happened during migration, go to Tcode SLG1 and see the error log. Correct the data and upload once again.


Tuesday, January 26, 2016

EMIGALL: Conversion program

1. Go to Tcode SE38. Provide a z-program name and click on create. Provide description and select executable program.

REPORT  ztest_emigall_conversion.

SELECTION-SCREEN BEGIN OF BLOCK grp2 WITH FRAME TITLE text-002.
PARAMETERS : p_file      TYPE rlgrap-filename  OBLIGATORY.
SELECTION-SCREEN END OF BLOCK grp2.

CONSTANTS: gc_ext_xls  TYPE string     VALUE '*.xls',
           gc_tab      TYPE abap_char1 VALUE  cl_abap_char_utilities=>horizontal_tab,
           gc_fs_wa                TYPE lvc_fname  VALUE '<fs_wa>-'.

DATA: gt_op_data TYPE rsanm_file_table.

DATA: gt_excel_tab            TYPE STANDARD TABLE OF alsmex_tabline,
      gs_excel_tab            TYPE alsmex_tabline,
      gt_fieldcat             TYPE lvc_t_fcat,
      gs_fieldcat             TYPE lvc_s_fcat,
      gv_value                TYPE string.

DATA: gt_dynpro               TYPE REF TO data,
      gs_dynpro               TYPE REF TO data.

FIELD-SYMBOLS :
      <fs_table>              TYPE STANDARD TABLE,
      <fs_wa>                 TYPE any,
      <fs_current_field>      TYPE any,
      <fs_field_value>        TYPE any.

AT SELECTION-SCREEN ON VALUE-REQUEST FOR p_file.
* F4 help for file path
  PERFORM f4help.

START-OF-SELECTION.
* Upload the Excel File to an internal table
  PERFORM upload_excel_to_itab.

  IF gt_excel_tab IS NOT INITIAL.
* Build the Field Catalog for creating the Dynamic Internal Table.
    PERFORM build_field_catalog.

* Create dynamic table from field catalog
    PERFORM create_dynamic_itab_wa.

* Fill the Dynamic internal table with data
    PERFORM fill_data.

* Create different performs for each migration objects
*   Convert CO data into EMIGALL format
    PERFORM convert_co_data.

* Write converted data file to PC
    PERFORM write_op_file.
  ENDIF.
*&---------------------------------------------------------------------*
*&      Form  F4HELP
*&---------------------------------------------------------------------*
*       text
*----------------------------------------------------------------------*
*  -->  p1        text
*  <--  p2        text
*----------------------------------------------------------------------*
FORM f4help .
  DATA: lt_filetable    TYPE filetable,
        lx_filetable    TYPE file_table,
        lv_return_code  TYPE i,
        lv_window_title TYPE string.

  lv_window_title = text-003.

  CALL METHOD cl_gui_frontend_services=>file_open_dialog
    EXPORTING
      window_title            = lv_window_title
      default_extension       = gc_ext_xls
    CHANGING
      file_table              = lt_filetable
      rc                      = lv_return_code
    EXCEPTIONS
      file_open_dialog_failed = 1
      cntl_error              = 2
      error_no_gui            = 3
      not_supported_by_gui    = 4
      OTHERS                  = 5.

  IF sy-subrc <> 0.
    MESSAGE ID sy-msgid TYPE sy-msgty NUMBER sy-msgno
               WITH sy-msgv1 sy-msgv2 sy-msgv3 sy-msgv4.
  ENDIF.

  READ TABLE lt_filetable INTO lx_filetable INDEX 1.
  p_file = lx_filetable-filename.
ENDFORM.                    " F4HELP
*&---------------------------------------------------------------------*
*&      Form  UPLOAD_EXCEL_TO_ITAB
*&---------------------------------------------------------------------*
*       text
*----------------------------------------------------------------------*
*  -->  p1        text
*  <--  p2        text
*----------------------------------------------------------------------*
FORM upload_excel_to_itab .
* create internal table with Excel values
* Attention: This function module belongs to application component FI-AA
  CALL FUNCTION 'ALSM_EXCEL_TO_INTERNAL_TABLE'
    EXPORTING
      filename                = p_file
      i_begin_col             = '1'
      i_begin_row             = '1'
      i_end_col               = '200'
      i_end_row               = '5000'
    TABLES
      intern                  = gt_excel_tab
    EXCEPTIONS
      inconsistent_parameters = 1
      upload_ole              = 2
      OTHERS                  = 3.
ENDFORM.                    " UPLOAD_EXCEL_TO_ITAB
*&---------------------------------------------------------------------*
*&      Form  BUILD_FIELD_CATALOG
*&---------------------------------------------------------------------*
*       text
*----------------------------------------------------------------------*
*  -->  p1        text
*  <--  p2        text
*----------------------------------------------------------------------*
FORM build_field_catalog .
  LOOP AT  gt_excel_tab INTO gs_excel_tab WHERE row EQ '1' .
    gs_fieldcat-fieldname  = gs_excel_tab-value.
    gs_fieldcat-coltext    = gs_excel_tab-value.
    gs_fieldcat-outputlen  = 50.
    APPEND gs_fieldcat TO gt_fieldcat.
    CLEAR gs_fieldcat.
  ENDLOOP.
ENDFORM.                    " BUILD_FIELD_CATALOG
*&---------------------------------------------------------------------*
*&      Form  CREATE_DYNAMIC_ITAB_WA
*&---------------------------------------------------------------------*
*       text
*----------------------------------------------------------------------*
*  -->  p1        text
*  <--  p2        text
*----------------------------------------------------------------------*
FORM create_dynamic_itab_wa .
  CALL METHOD cl_alv_table_create=>create_dynamic_table
    EXPORTING
      it_fieldcatalog           = gt_fieldcat
    IMPORTING
      ep_table                  = gt_dynpro
    EXCEPTIONS
      generate_subpool_dir_full = 1
      OTHERS                    = 2.

*Assign the Dynamic internal table reference to a Field Symbol and
*create a Work Area of its Line type.
  IF sy-subrc EQ 0.
    ASSIGN gt_dynpro->* TO <fs_table>.
    CREATE DATA gs_dynpro LIKE LINE OF <fs_table>.
    ASSIGN gs_dynpro->* TO <fs_wa>.
  ENDIF.
ENDFORM.                    " CREATE_DYNAMIC_ITAB_WA
*&---------------------------------------------------------------------*
*&      Form  FILL_DATA
*&---------------------------------------------------------------------*
*       text
*----------------------------------------------------------------------*
*  -->  p1        text
*  <--  p2        text
*----------------------------------------------------------------------*
FORM fill_data .
  LOOP AT gt_excel_tab INTO gs_excel_tab WHERE row NE '1' .
    READ TABLE gt_fieldcat INTO gs_fieldcat INDEX gs_excel_tab-col.
    CHECK sy-subrc EQ 0.
    CONCATENATE gc_fs_wa gs_fieldcat-fieldname INTO gv_value.
    ASSIGN (gv_value) TO <fs_current_field>.
    IF <fs_current_field> IS ASSIGNED.
      <fs_current_field> = gs_excel_tab-value.
    ENDIF.

    AT END OF row                                          ##LOOP_AT_OK.
      APPEND <fs_wa> TO <fs_table>.
      CLEAR <fs_wa>.
    ENDAT.
  ENDLOOP.
ENDFORM.                    " FILL_DATA
*&---------------------------------------------------------------------*
*&      Form  CONVERT_CO_DATA
*&---------------------------------------------------------------------*
*       text
*----------------------------------------------------------------------*
*  -->  p1        text
*  <--  p2        text
*----------------------------------------------------------------------*
FORM convert_co_data .
  DATA: lw_op_data    TYPE rsanm_file_line,
        lv_legacykey  TYPE emg_oldkey,
        lv_pltxt      TYPE pltxt,
        lv_house_num1 TYPE ad_hsnm1,
        lv_street     TYPE ad_street.

  LOOP AT <fs_table> ASSIGNING <fs_wa>.

    ASSIGN COMPONENT 'LEGACYKEY' OF STRUCTURE <fs_wa> TO <fs_field_value>.
    lv_legacykey = <fs_field_value>.
    ASSIGN COMPONENT 'PLTXT' OF STRUCTURE <fs_wa> TO <fs_field_value>.
    lv_pltxt = <fs_field_value>.

    CONCATENATE lv_legacykey 'CO_EHA' lv_pltxt INTO lw_op_data SEPARATED BY gc_tab.
    APPEND lw_op_data TO gt_op_data.

    ASSIGN COMPONENT 'STREET' OF STRUCTURE <fs_wa> TO <fs_field_value>.
    lv_street = <fs_field_value>.
    ASSIGN COMPONENT 'HOUSE_NUM1' OF STRUCTURE <fs_wa> TO <fs_field_value>.
    lv_house_num1 = <fs_field_value>.

    CONCATENATE lv_legacykey 'CO_ADR' lv_street lv_house_num1 INTO lw_op_data SEPARATED BY gc_tab.
    APPEND lw_op_data TO gt_op_data.

    CONCATENATE lv_legacykey '&ENDE' INTO lw_op_data SEPARATED BY gc_tab.
    APPEND lw_op_data TO gt_op_data.
  ENDLOOP.
ENDFORM.                    " CONVERT_CO_DATA
*&---------------------------------------------------------------------*
*&      Form  WRITE_OP_FILE
*&---------------------------------------------------------------------*
*       text
*----------------------------------------------------------------------*
*  -->  p1        text
*  <--  p2        text
*----------------------------------------------------------------------*
FORM write_op_file .
  DATA: lv_filename   TYPE string,
        lv_path       TYPE string,
        lv_fullpath   TYPE string.

  CALL METHOD cl_gui_frontend_services=>file_save_dialog
    CHANGING
      filename = lv_filename
      path     = lv_path
      fullpath = lv_fullpath.

  CALL FUNCTION 'GUI_DOWNLOAD'
    EXPORTING
      filename = lv_fullpath
    TABLES
      data_tab = gt_op_data.
ENDFORM.                    " WRITE_OP_FILE


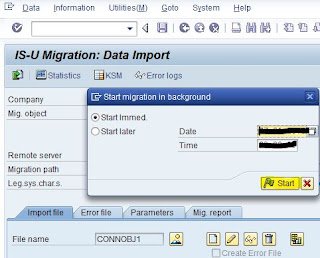
2. Activate the program and execute. Provide the legacy file in the given format. Below is the legacy file format for the connection object migration in our scenario.


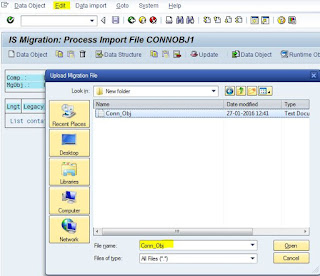
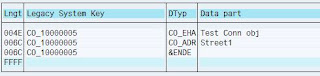
Provide a file name and save the converted file in local drive. The converted file looks like this.
CO_10000005 CO_EHA Test Conn obj
CO_10000005 CO_ADR Street1 H101
CO_10000005 &ENDE


Wednesday, January 13, 2016

EMIGALL: Download sample file format

1. Go to Tcode EMIGALL and enter our company TEST, then click continue.


2. Select the migration object by double clicking on it. Click on 'Data Import' button (Shift+F6).


3. Select radio button 'Dialog work process' and provide a file name. The uploaded data will be stored in the application server (Tcode-AL11) in this file name. Click on create button.


4. Click on Create Data Object (F5) button, you will get a pop-up. Provide Legacy System Key, a unique key to identify each data record in legacy. Click on 'Specify data' button (Enter)


5. Provide the field values under the data type CO_EHA, then click on continue.


6. Click on Specify data button (Enter) again to provide field values under data type CO_ADR, then click on continue.


7. Place cursor under Lngt to select a record, then click on 'Import Data Object' button (Shift+F5)


8. To display the created connection object, place cursor under Lngt, then click on 'Runtime Object' (Ctrl+F10).


9. Click BACK button, then go to menu, click on Edit->Data->Download. Then give a file name and save the file as a '.TXT' file.


The downloaded sample file looks like below.
CO_10000001 CO_EHA Test CON Object
CO_10000001 CO_ADR Street number 2 101
CO_10000001 &ENDE

10. Click BACK button and come to the below screen. Then click on 'KSM' button (F5), we can see the legacy key and the corresponding SAP key (connection object number) allocation.  


Click on display Key Allocation


11. We can also see this key allocation in table TEMKSV. Tcode-SE16N

F8


Tuesday, January 12, 2016

EMIGALL: Configure the fields of Migration object

1. Go to Tcode EMIGALL and enter our company TEST, then click continue. 


2. Double click on the migration object CONNOBJ, then it will display the structures belongs to that migration object under 'Auto.Struct'. To display all the structure of the migration object, go to menu, click on Automatic structure->Display List->All. Now we can see all the structures belongs to CONNOBJ.


3. Double click on each structure under 'Auto.Struct' to see the fields belongs to it. To display all the fields of a structure, go to menu, click on Field->Display List->All


4. Now we need to configure the below fields for CONNOBJ which we already identified by creating an actual connection object in the system using Tcode ES55.

PLTXT- Description
STREET- Street
HOUSE_NUM1- House number
COUNTRY- Country
TIME_ZONE- Time zone
TAXJURCODE- Tax Jurisdictn


4. Double click on the first structure EHAUD, then find (Ctrl+F) the field PLTXT in the first structure. Double click on PLTXT. You will get the below screen.


Note: Enable check box 'Generate'. Enable 'Req. Fld' only if the field is mandatory. Select radio button 'Transfer' if the value for the field is provided through file during data migration.

Search the next field STREET in the sturcture EHAUD. Since it is not available in this structure, search in the next structure ADDR_DATA. Enable check box 'Generate' for fields STREET and HOUSE_NUM1. Keep radio button 'Transfer' as these fields will also get value from file.

Double click on the field COUNTRY in structure ADDR_DATA. Enable check box 'Generate' and 'Req Fld' since country is maintained as a mandatory field for connection object in the system. We can assume country as a constant if we are migrating data for a specific country. In that case, we can select radio button 'Fixed value' to maintain country as a constant. That means, we don't need to maintain this value in the migration file.


Under tab 'Fxd val', create fixed value for country. 


Similarly, configure TIME_ZONE and TAXJURCODE as fixed value. 

Note: Disable check box 'Generate' for all other fields which are not required. Also disable check box 'Generation' at Automatic structure level (Menu->Automatic structure->Change).

5. Now go to menu, click on Field->Display List->Non-generated off, we get only the required fields which we configured as per our business requirement. Also at structure level, we can display only required structures (Menu->Automatic structure->Display List->Non-Generated off). Now our migration object looks like this.


6. Click on generate button to create programs required for migration. Yellow mark changes to green if the programs generated successfully and the migration object is ready for migration now. 


EMIGALL: Connection Object creation using ES55

1. Go to Tcode ES55 to create a connection object.


2. Press enter and provide description for the connection object. Also fill the mandatory fields and other required fields as per the business requirement. I have filled the below highlighted fields and clicked on SAVE.


3. Get the field name of the highlighted fields. Place the cursor in the field, then press F1. Click on Technical information, you will get the fields name.


Below are the field names that needs to be configured for the migration object CONNOBJ for our company TEST. 

PLTXT- Description
STREET- Street
HOUSE_NUM1- House number
COUNTRY- Country
TIME_ZONE- Time zone
TAXJURCODE- Tax Jurisdictn.


Monday, January 11, 2016

EMIGALL: Copy Migration Object

1. Go to Tcode EMIGALL and enter the standard company SAP, then click continue. 


2. We are going to migrate connection object data, so our migration object is CONNOBJ. We need to copy CONNOBJ from the standard company SAP to our own new company TEST. For doing this, first double click on the migration object (CONNOBJ). Go to menu, click on Migration object->Copy. Following screen appears and fill Company with our company 'TEST'. Then click on copy.


We will get the following message. This means, we have to change the blocking status of this migration object to '000' if we need to perform migration. We will change this status later. Click on continue.


3. Change the status from '100' to '000'. Go to menu, click on IS-U Migration->Other company. Provide our company 'TEST' and press continue, we get the following screen.


Double click on the migration object CONNOBJ. Go to menu, click on Migration object->Change. Then change the 'Blocking Status' to 000.


Also mark the check box 'Import Function Mod.' under tab Parameters.


This enables 'Data Object' button of the 'import data screen' during testing. Below is the sample import data screen. 


Note: By default, the Import Data Object button is disabled. So we won't be able to import our sample data for testing. 


EMIGALL: Data migration, step by step explanation

SAP IS-U migration workbench (Tcode-EMIGALL) is an SAP IS-U tool to migrate legacy data into the SAP IS-U system. SAP has provided migration objects like PARTNER, ACCOUNT, CONNOBJ, PREMISE.. etc for migrating the corresponding data. If SAP provided migration objects are not satisfying our migration requirement, we can create our own custom migration objects.

We take connection object as a reference to explain EMIGALL data migration process. Following are the steps to migrate connection object data into SAP IS-U.


1. Create our own company in EMIGALL by copying standard company 'SAP'.

We have to create our own company in EMIGALL for migrating data because we are not supposed to make any changes to the standard company SAP. If we make any changes to this SAP company, we will not have any standard company where we can compare. 
Click here to see how to create a new company in EMIGALL.


2. Copy migration objects to our own company. 

Identify the migration objects based on the data that needs to be migrated from legacy to SAP. In our scenario, we are going to migrate connection object data. So the migration object for migrating connection object is CONNOBJ. 
Click here to see how to copy migration objects to a new company.

3. Create an actual Connection Object in SAP IS-U using Tcode ES55. 

This help us to identify the fields that needs to be configured in the migration object.

Click here to see how to create a connection object in SAP IS-U using ES55.

4. Configure the fields of migration object.

When we copy a migration object of the standard company SAP, all the available fields are copied. But we don't need all these fields. So we need to identify the required fields based on the business requirement and those fields needs to be configured.  
Click here to see how to configure the fields of migration object.

5. Create EMIGALL sample file format and download it.

The format of EMIGALL upload file varies based on the migration object and its configurations. We can download the file format by providing sample data.
Click here to see how to download a sample file.

6. Create a conversion program to convert legacy data from excel format to EMIGALL supported format.

A conversion program needs to be created to convert legacy excel data into EMIGALL supported txt file format.
Click here to see a sample conversion program. 


7. Upload the converted legacy data using EMIGALL in batch job.

After converting the legacy data into EMIGALL supported format, we can start uploading legacy data.
Click here to see how to upload legacy data.


EMIGALL: Company creation

1. Go to Tcode EMIGALL and enter default company SAP which will have all the standard migration objects.


Note: Please do not make any changes to SAP Company. We can copy this SAP company to create our company as per the data migration requirements.

2. Go to menu IS-U Migration->Company maintenance


Enter a new company name and click on create button, then provide company name (description) and Dev. class (package). Under Data Import tab, provide Leg.sys.char.s as 1100. By default IS-U char. set. filled as 4103. Also provide 'DIA mig. path' as application server (Tcode-AL11) folder location.


After entering the above data, click on SAVE button, then BACK button. BACK button take as to the default SAP company. For going into our own migration company, follow the below path.

3. Go to menu IS-U Migration->Other company. Then provide our company code in the pop-up and press enter.


Since we haven't assigned any migration objects to our newly created company, we get the following screen without any migration object.